Guide to Laser Engraving Glass
Laser engraving is quite popular when it comes to personalization. From customized gifts to artwork, laser engraving metamorphoses any plain object into something special. And the best part? It can also engrave glass. Yes, you heard that right. Most people think only CO₂ lasers can work on glass, but you can actually engrave glass with a diode laser.
This guide is all about how to laser engrave glass, whether it can be laser-engraved or not, and also the step-by-step process of glass laser engraving.
Can I Laser Engrave on Glass?
Can you laser engrave on glass? Yes, Glass is definitely laser-engravable, but it depends on which laser you are using, i.e., CO₂ or diode.
- CO₂ lasers (10.6 μm): These are industry standards when it comes to glass engraving. The glass highly absorbs these lasers, and they are efficient enough to etch compounds with fine detail, requiring nearly no preparation on the surface afterwards.
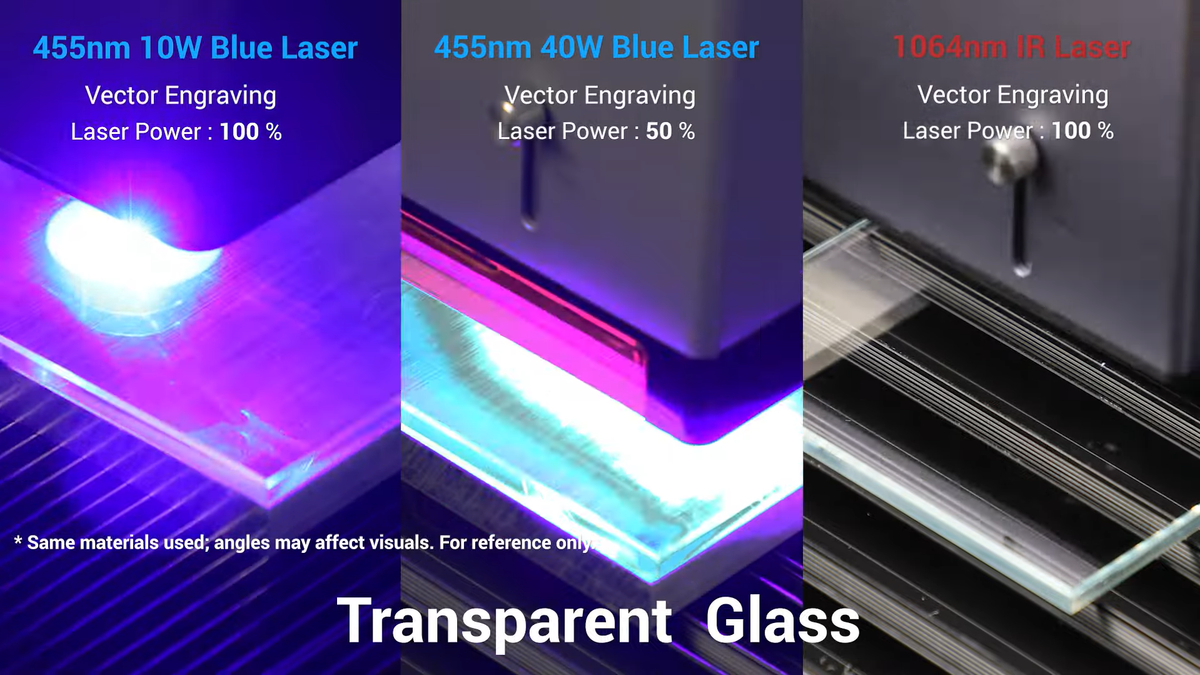
- Diode lasers (~450 nm): These emit light that passes through most transparent glass. However, by applying a temporary surface treatment to absorb the laser energy, diode lasers can also effectively engrave glass.
While CO₂ lasers offer a solution preferred by professionals and high-throughput production, diode lasers are a legitimate and cost-effective alternative to consider.
NOTE: Glass cannot be engraved by fiber lasers because the glass is virtually transparent for its laser wavelength (usually 1064 nanometers) and possesses very low absorption. Subsequently, the laser energy is unable to exert its effect on the glass surface: Just as sunlight would pass through window glass without leaving a mark, the light emitted by fiber lasers will also travel through glass without "burning" a mark.
You may also want to know Can You Laser Engrave Metal.
How to Laser Engrave Glass
Whether you're using a CO₂ or diode laser, the workflow is similar—but diode lasers require one additional step: surface coating. The following is the step-by-step approach:
Step 1: Select and Prepare Your Glass
For best results, choose:
- Flat, smooth glass surfaces
- Soda-lime glass (common in windows and drinkware)
- Mirror-backed glass (especially effective with diode lasers for enhanced contrast)
Preparation is crucial:
- Clean thoroughly with glass cleaner
- Use a lint-free microfiber cloth
- Remove all dust, oils, and fingerprints
- Allow to dry completely
Step 2: Prepare Your Design
Glass engraving doesn't produce shadows or gradients like other materials. For best results:
- Convert images to black and white
- Keep details minimal and clean
- Use high contrast in your design
- Consider image orientation options:
- Standard Effect: Engraves exactly as designed
- Negative Effect: Creates a reversed contrast (many prefer this for glass)
- Custom Inversion: If you like the added contrast of painted glass but don't want a negative effect, you can invert your image in software like Lightburn before engraving
Step 3: For Diode Lasers Only — Apply a Surface Coating
Transparent glass does not absorb diode laser energy unless coated. Applying a temporary layer helps the laser mark the surface.
How the coating works: Imagine sunlight passing through a window without heating the glass. Now imagine placing black paper on that window—it quickly heats up. The coating works similarly by absorbing laser energy and converting it to heat, which creates microfractures or expansion at the glass surface. The diode laser doesn’t engrave the glass directly—it engraves the coating, which in turn marks the glass beneath.
Effective coating options:
- Black tempera paint (water-soluble for easy removal)
- Commercial laser marking sprays
- Specialized nanoparticle coatings (containing metal oxides)
- Thin layer of matte black spray paint
Apply an even, thin coating and let it dry completely before proceeding.
Step 4: Set the Laser Parameters
The exact values can vary based on your machine and coating, making general recommendations somewhat ineffective without specific context.
To enhance your creating experience and make it smoother, Snapmaker offers helpful resources: a concise overview of recommended laser processing parameters. These parameters are derived from official testing and provide a starting point for various materials. While specific settings for coatings on glass may not always be listed, these guidelines can establish a solid foundation for suitable power and speed ranges for material removal.
Tips: Check out Snapmaker's official material testing guide for comprehensive material test insights.
Step 5: Post-Process the Engraving
After completing the laser process, you have several finishing options:
Option 1: Remove the Coating
- Use warm water and a soft sponge or cloth
- Gently wipe away the paint residue
- For stubborn areas, use mild soap or isopropyl alcohol
- Dry thoroughly with a lint-free cloth
Option 2: Keep the Coating for Unique Effects
- The paint coating can actually become part of your artistic design
- Creates a distinctive two-tone visual effect
- Particularly effective when using colored paint for artistic glass pieces
Additional Enhancement Techniques:
- Fill etched areas with white paint or polish for contrast
- Add backlighting with LEDs for dramatic effect
- Apply glass sealant to protect the engraving
- Mount or frame for display purposes
Why Choose a Diode Laser for Glass Engraving?
While not the most powerful solution, diode lasers offer several advantages that make them a smart alternative for certain users:
Accessibility & Affordability
- Significantly lower initial investment
- Compact design fits small workspaces
- Lower operating costs and maintenance
- Suitable for beginners testing the waters
Perfect for the Maker Mindset
- Encourages experimentation with different techniques
- Aligns with DIY ethos of creative problem-solving
- Allows for learning and skill development at your own pace
- Compatible with multiple materials beyond glass
Key Takeaways
- Both CO₂ and diode lasers can create beautiful glass engravings
- CO₂ lasers offer the most direct method, but at a higher cost
- Diode lasers require a surface coating but provide an affordable alternative
- Success comes from proper preparation, appropriate settings, and post-processing
- With practice, even beginners can achieve professional-quality results